You have no items in your shopping cart.
13
Oct
1. Setting the Foundation
Embarking on an LED Shoebox parking lot pole light project requires more than just technical know-how. It's about understanding the environment, the stakeholders involved, and the desired outcomes. Here's a deeper dive into laying the foundation:
- Stakeholder Needs: Before anything else, engage with the property owners, managers, or other primary stakeholders. Understand their priorities. Is it safety they're most concerned about? Or perhaps energy efficiency? Their insights will shape the project's direction.
- Budget Considerations: Every project has financial constraints. It's crucial to get a clear picture of the budget early on. This will influence the choice of fixtures, installation methods, and even maintenance plans.
- Environmental Impact: LED lights are energy-efficient, but it's still essential to consider their environmental footprint. Think about how the lights will impact the surrounding ecology, especially if the area is home to nocturnal wildlife.
- Aesthetic Goals: While the primary purpose of lighting is functional, aesthetics shouldn't be ignored. How will the lights fit into the broader design landscape of the area? Are there architectural features to highlight or mask?
- Future Expansion: Consider the long-term view. Is the area in question likely to see further development or changes in the next few years? It's wise to implement a solution that can be easily adapted or expanded.
Remember, the foundation of any successful lighting project is a thorough understanding of its goals and constraints. By ensuring you have a solid grasp of the project's backbone, you're setting yourself up for success from the get-go.
2. Evaluating Your Project
Before rolling out your tools and equipment, a thorough evaluation of your project can make the difference between a smooth installation and one filled with unexpected challenges. Here's a step-by-step approach:
- Physical Inspection: Walk the entire area during both day and night. This hands-on approach lets you identify potential dark spots, existing infrastructure, and potential hazards.
- Power Sources: Identify where the electrical sources are and determine if additional infrastructure is needed. This will help in planning the wiring routes.
- Mounting Points: Note potential mounting spots for the lights. Consider height, potential obstructions, and whether additional poles are needed.
- Photographs: Take photos from multiple angles. These visual aids can be invaluable during the planning phase and for future reference.
- Sketches: Rough sketches of the area, indicating where you plan to install lights, can be a handy visual guide. Include potential wiring routes.
- Local Lighting Codes: Visit your local municipality or governing body's office to understand the lighting codes specific to parking lots. This might include rules about light trespass, brightness levels, or even the color of lights.
- Environmental Regulations: Some areas have specific regulations to protect nocturnal wildlife. Ensure your lights are compliant.
- Feedback Loop: Regularly check back with property owners or managers. Their feedback, especially during the evaluation phase, can provide insights you might have missed.
- Safety Concerns: Ask about specific areas where safety might have been a concern in the past. These spots might need special attention or brighter lighting.
- Tools and Equipment: Based on your evaluation, list down all the tools and equipment you'll need. This can range from ladders and drills to specific mounting brackets.
- Team Allocation: Determine how many team members you'll need for the installation. Consider assigning specific roles based on expertise.
By meticulously evaluating your project using these practical steps, you'll ensure that once the installation begins, it proceeds efficiently, with minimal hiccups.
3. Mastering LED Shoebox Parking Lot Pole Lights: A Contractor's Toolbox
Understanding the nuances of LED Shoebox lights is crucial to ensure optimal performance and longevity. Here's a hands-on guide to get the most out of these fixtures:
- Brightness Levels: Familiarize yourself with the lumen output of different models. The required brightness will vary based on the specific needs of the area.
- Color Temperatures: LED Shoebox lights come in varying color temperatures, typically measured in Kelvin (K). While 5000K provides a daylight-like appearance, you might opt for warmer or cooler tones based on client preference or local regulations.
- Beam Angles: Understand the spread of light. Wider beam angles disperse light over a larger area but might be less intense. Narrow angles focus the light, ideal for spotlighting specific areas.
- Mounting Heights: Depending on the specific model and the area's size, there will be an optimal mounting height to ensure uniform illumination. Always refer to the manufacturer's guidelines.
- Fixture Spacing: To avoid dark spots, ensure fixtures are spaced appropriately. This often requires some calculations based on the light's throw and intensity.
- Wiring and Connectivity: LED Shoebox lights often come with varying wiring options, including plug-and-play or hardwired setups. Ensure you have the necessary connectors and wiring on hand.
- IP Rating: Check the Ingress Protection (IP) rating of the lights. This rating will tell you how well the fixture is protected against dust and water. For instance, an IP65 rating is dust-tight and protected against water jets.
- Heat Dissipation: Ensure the fixtures have adequate ventilation or heat sinks. LEDs are energy efficient, but they still produce heat. Proper heat dissipation will extend the life of the light.
- Dimming Capabilities: If the lights come with dimming capabilities, understand the range and compatibility with dimming controls.
- Sensor Integration: Many modern LED Shoebox lights can integrate with motion or ambient light sensors. If your project requires such features, ensure you're familiar with the installation and setup.
- Easy Access: When installing, consider future maintenance needs. Place fixtures in locations that are easily accessible for bulb replacements or repairs.
- Cleaning Regimen: Dirt and debris can reduce light output over time. Schedule regular cleanings and check-ups to ensure peak performance.
By having a deep, practical understanding of LED Shoebox parking lot pole lights, contractors can ensure a smooth installation process, optimal performance, and satisfied clients.
4. Selection and Placement: Perfecting the Art of Illumination
Choosing the right lights and positioning them effectively is the cornerstone of a successful lighting project. Here's a comprehensive guide to help contractors nail this crucial step:
- Traffic Flow: Observe the typical traffic patterns in the area. Main thoroughfares may need brighter and more consistent lighting, while lesser-used areas might require less intense illumination.
- Safety Hotspots: Identify areas prone to accidents or incidents. Crosswalks, entrances, exits, and speed bumps might need additional or specialized lighting.
- Existing Infrastructure: Take note of existing poles, buildings, or other structures. They can influence where new poles might be needed and where lights can be mounted.
- Light Intensity: Based on the area's needs, select LED Shoebox lights that offer the required lumen output. Remember, it's not just about brightness; uniformity is key.
- Energy Efficiency: Opt for models that provide the best luminous efficacy (lumens per watt). This ensures maximum brightness with minimal energy consumption.
- Warranty and Reliability: Always check the warranty period and any certifications. This can be a testament to the product's durability and quality.
- Avoiding Light Pollution: Position lights so they primarily illuminate the intended area. Consider fixtures with shields or guards to direct light downward and prevent unnecessary spillage into the night sky or neighboring properties.
- Reducing Glare: Ensure lights are positioned to minimize direct glare to drivers and pedestrians. This might involve adjusting the tilt or using diffusers.
- Spacing: Consistent spacing between fixtures ensures even illumination. However, remember to adjust based on the unique needs of different areas.
- Control Systems: If the lights are to be integrated with automated systems, ensure they're placed in locations with good connectivity, be it wired or wireless.
- Sensor Placement: If using sensors, like motion or ambient light detectors, ensure they're positioned to accurately capture the necessary data. For instance, an ambient light sensor should not be placed directly under a fixture.
- Modular Setups: Opt for setups that allow easy replacements or upgrades. The world of LED lighting is continually evolving; being able to swap out parts can be a boon.
- Scalability: Consider future expansion or changes to the area. Place fixtures and wiring in a way that allows for additions or reconfigurations without a complete overhaul.
By meticulously choosing and positioning LED Shoebox parking lot pole lights, contractors can ensure optimal illumination, safety, and energy efficiency, leading to satisfied clients and long-lasting installations.
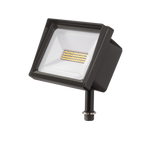
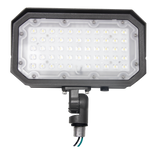
5. Spotlight: Jarvis JSAL-G2 LED Slim Area Light
When selecting lights for any project, the specifications and features of the luminaire can make all the difference. Let's take a closer look at the Jarvis JSAL-G2 LED Slim Area Light, a product that stands out with its unique offerings.
Key Features:
- Z10 Accessory Ready: This feature ensures compatibility with a range of accessories, making customization a breeze.
- Quick-mount System: The arm attaches separately to the pole, which facilitates a speedy one-person installation. No more fumbling around or requiring extra hands!
- Unique Design Air Vent: This design element serves a critical purpose. It helps prevent gasket failure or water damage, which can be common issues in some lights due to air pressure imbalances.
- Customizable Optics: The JSAL-G2 offers multiple optics options, letting you tailor the light spread to your specific project needs.
- Advanced Controls: With features like 0-10V dim-to-off and 12V auxiliary power for accessories, these lights offer flexibility in operation.
- Adjustable Color Temperature and Wattage: This feature lets you tweak the lighting ambiance and power consumption as per the project's needs.
- Network Compatibility: The lights can be integrated with Jarvis Link networked lighting control systems, further expanding their operational capabilities.
Comparative Analysis:
While the Jarvis JSAL-G2 series boasts an array of features, it's also essential to understand how it stands against competitors:
- Jarvis JSAL-G2 Series Advantages:
- Quick and straightforward installation process.
- Reduced chances of gasket failures and water damage.
- Multiple accessory and control options.
- A 10-year warranty, ensuring longevity and reliability.
- Competitors' Shortcomings:
- Limited sensor options which might also be challenging to install.
- Frequent gasket failures and water damage due to poor design.
- Installation can be cumbersome as the mounting arm is attached to the fixture.
6. Conclusion
Mastering the intricacies of LED Shoebox parking lot pole lights requires both knowledge and experience. With the right approach to selection, installation, and maintenance, you'll ensure efficient and lasting lighting solutions for your clients.